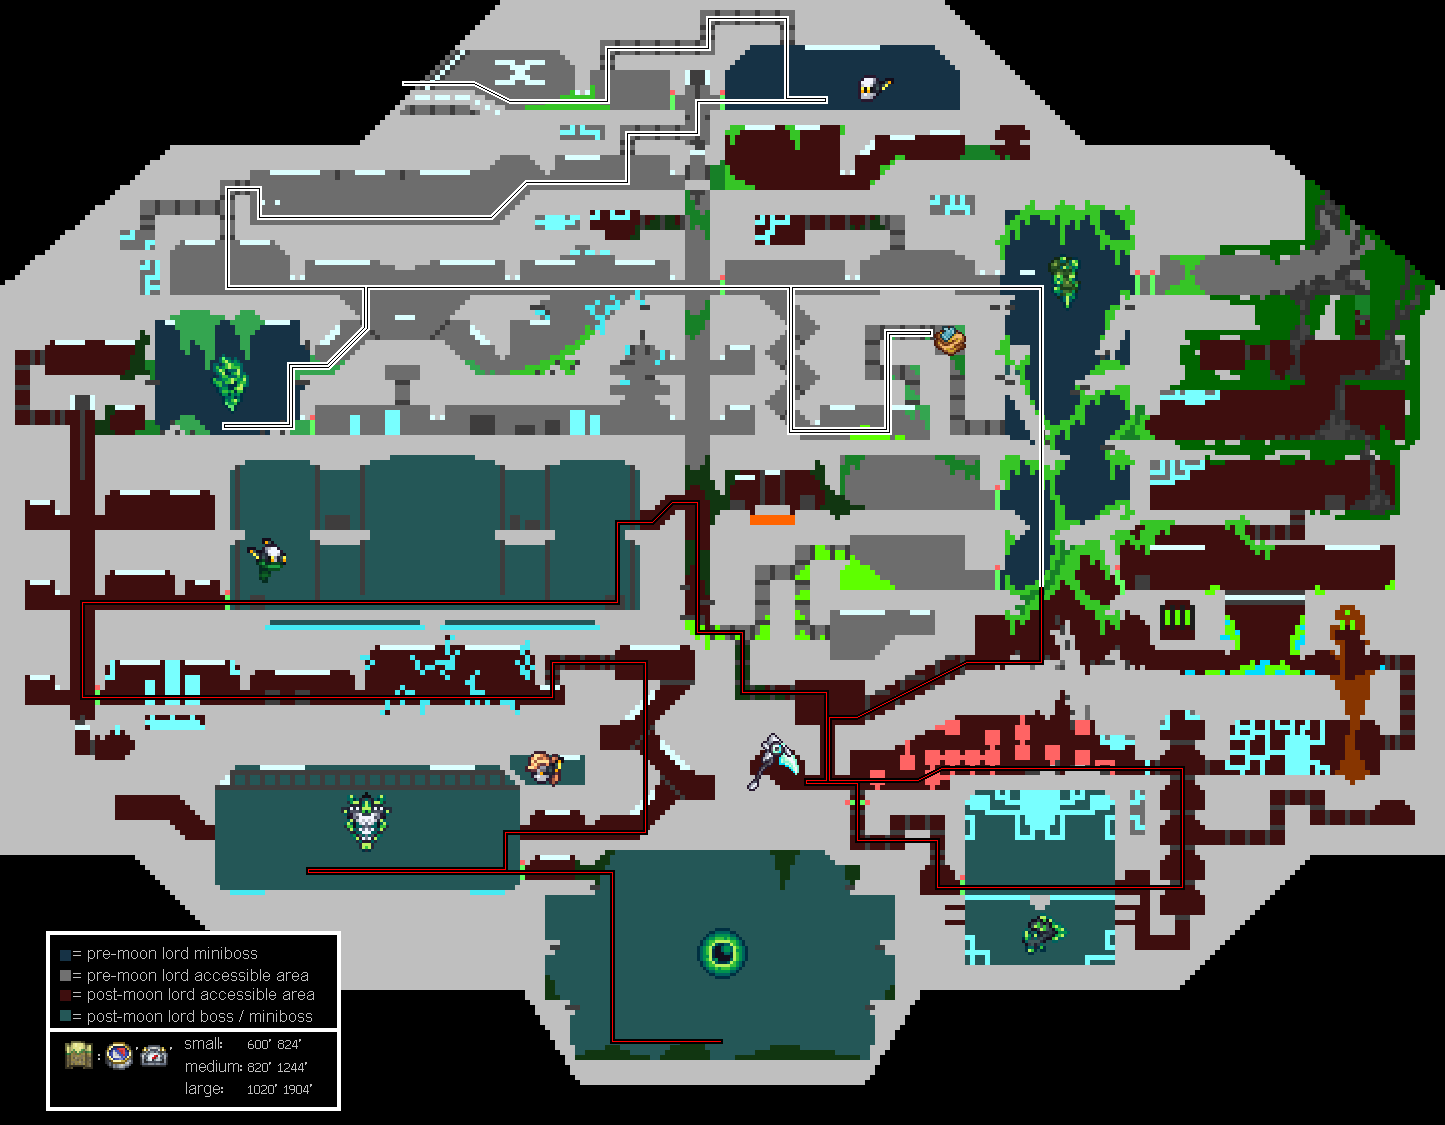
Map view of the Abandoned Lab, along with the direct path to the end (click to enlarge). The white path is accessible post-Mechanical Bosses, and red path is accessible post-Moon Lord.
The Abandoned Lab, known in the mod's lore as Teochrome Research Laboratory, is a massive underground dungeon that generates upon world generation. Unlike other areas in Terraria, the Abandoned Lab has a static structure of similar size to the Jungle Temple, and will always be the same in all worlds. With its dangerous defenses and debuffs, the player must exercise caution prior to entering.
The Abandoned Lab will always be generated at the same location, depending on map size:
| Map Size | Lateral Position | Depth |
|---|---|---|
| Small | 600' East | 824' Underground |
| Medium | 820' East | 1244' Underground |
| Large | 1020' East | 1904' Underground |
It's recommended to acquire the IO-Locator accessory and equip it before trying to find the lab.
The Abandoned Lab can only be initially visited in Hardmode, after the player has defeated all three Mechanical Bosses; attempting to visit the Lab prior will unleash invincible Laboratory Drones that will relentlessly attack the player. Following the defeat of the Mechanical Bosses, the drones will be deactivated, allowing access to a portion of the Lab, including the rooms containing The Janitor, Stage 3 Infected Scientist, and Irradiated Behemoth mini bosses, as well as a number of items from Petrified Wood Chests. Each mini boss drops a Lab Access Panel, which deactivates the laser security systems to unlock additional sectors of the Lab. After Golem is defeated, the player gains the ability to mine Uranium, allowing access to materials crafted by said material.
The rest of the Abandoned Lab becomes accessible after the player has crafted at least one of the Luminite Pickaxes, or by means getting the Laser Drill which have sufficient pickaxe power to break the Dark Sludge Blocks blocking access to the rest of the Lab, recommended to be explored post Moon Lord. Additionally, the player gains the ability to open Lab Chests with a Keycard Dropped from Moon Lord. After defeating Blisterface, the player will be rewarded with the Nano Pickaxe which can break Black Sludge Blocks, allowing complete access to the Abandoned Lab, such as the Xenium Smelter located to the right of The Janitor and the later sectors in the lab, which include the Protector Volt and MACE Project mini bosses and the final boss of the dungeon: Patient Zero.
Contents[ | ]


.png)
The Lab[ | ]
The Abandoned Lab is composed of several rooms divided into sectors, each named after a letter of the Greek Alphabet (with the exception of the Foyer and Sector Zero). These sectors are seperated by minibosses fought in each preceding sector.
All Sector Features[ | ]
There are several features the occur in all sectors, as long as the mechanical bosses are defeated.
- Petrified wooden chests can be found scattered around the lab, which are able to be opened.
- Several enemies exclusive to the lab spawn, including Infection Hives that spawn around the lab and Sludge Blobs that spawn from mining sludge blocks as well as the Infection Hives.
Foyer[ | ]
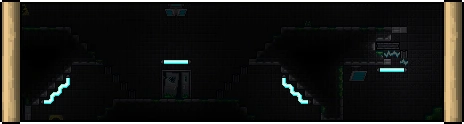
The Foyer is mainly composed of an entrance blocked by sludge blocks and a waiting room, as well as the top of the elevator to the first part of the lab. The entrance, as it is blocked by sludge, can only be entered after obtaining a Pickaxe Axe or Drax, although even if it is entered, invincible Laboratory Drones and Laboratory Turrets will attack the player until they are killed or exit the lab before all mechanical bosses are killed, after which they will be deactivated. As the elevator blocks the way to the waiting room, the vent shaft above the lab must be navigated through to the waiting room, where the player will encounter the lab's first miniboss: The Janitor. After some dialogue, the robot will fight the player, with dialoge interspersed throughout. When defeated, The Janitor will give the player the Lab Access Panel for the Alpha Sector, before exiting through a nearby door.
Sector Alpha[ | ]
The first Sector of the lab, Sector Alpha, appears to have been where the majority of Teochrome scientists spent the time, with a cafeteria and several break rooms. Wires circulate around the area, and there are several rooms that are innaccessable when the lab is first entered. This is also the first sector where lab enemies will be encountered, including scientists infected with Stage 1 of Xenomite, who swarm from broken, open doors (the ones that are closed are safe). The elevator, blocked by sludge, has to be bypassed by way of vent, after which the player will make their way through the cafeteria, then through another vent to the lower part of the Sector. The lower section consists of a room leading both to the following Sector and a room filled with crystallised Xenomite, as well as a monitor that summons the second miniboss: a Stage 3 Infected Scientist, a scientist infected with the last stage of Xenomite, reduced to a crystal with a skeleton inside. The battle mostly consists of the crystallised man teleporting and firing crystallised Xenomite, changing everytime it is reduced by a third of health (66%, then 33%). When it is destroyed, it will drop a floppy disk, possibly one made by the man before he was contained and eventually succumbed to crystallisation, as well as the Lab Access Panel for the Beta Sector.
Sector Beta[ | ]
The second Sector of the lab, Sector Beta, appears to be where much of the lab's research took place, as there is a large amount of computers and electricity, which is harmful to the player when touched. The lower part of this Sector also contains two Xenium Refiners, which are used to create Xenium equipment later in the game, along with a sewer hole where Irradiated Sludge enemies jump out from. The upper part of the Sector leads to a room with a small deposit of Uranium, as well as a vent with a dead scientist wearing a hazmet suit, who can be right-clicked to obtain a Hazmat Suit for free as well as a Crowbar, which does much more damage to infected enemies. The rightmost part of the Sector consists of the top of a room of collapsed bridges, as well as a monitor which summons, from the ceiling, the third miniboss: the Irradiated Behemoth, an unfortunate scientist who was possibly trapped in the ceiling, irradiated badly, and infected with Stage 3 Xenomite. The fight against the behemoth is in similar fashion to the Wall of Flesh, although in a much shorter time frame. After put out of it's misery, the behemoth will drop the Lab Access Panel for the Gamma Sector.
Post Moon-Lord Changes[ | ]
There are several features in the lab present that occur in all Sectors, albeit only after the Moon Lord is defeated for the first time.
- Scientists infected with stage two Xenomite infection begin to swarm from the rooms they are contained in.
- Lab Chests around the lab can be opened, as the Keycard required to open them is craftable with Luminite bars.
Sector Gamma[ | ]
The third Sector of the lab, Sector Gamma, appears to have been where the lab's radioactive core was located, and as such, is the most destroyed Sector in the lab. The uppermost part of the Sector is almost completely destroyed, with a hole in the lap as well as several destroyed levels. Sector Gamma is also where The Janitor can be reencountered, although he is much more docile compared to when first met, albiet not necessarily polite. Left to The Janitor is a room with the Xenium Smelter, which, as it is hot enough, is able to melt down metals into Molten Scrap. The lowest part of the Sector is nearly completely flooded, and is the only part of the lab where Plutonium is found, along with, under the core, the unbreakable and massively dangerous Corium, which blocks off a room in the lab, having leaked down to another level of the lab. In order to progress into the lower sections of the lab, the player must visit the Sector after defeating the Moon Lord, as the hard sludge blocks require at least a Lunar Pickaxe to break. The lowest levels of the Sector contain a room of lasers, which, when touched, will deal massive damage to the player. Luckily, as they are submerged in water, these lasers can be avoided relatively easily. After the laser maze is navigated, the player moves down to a room with a mass of wires at the top and a small basin of water at the bottom, with a bridge containing a monitor which summons the fourth miniboss: Blisterface, an unfortunate goldfish which, combined with an excess of radiation and the Xenomite infection, increased in size tenfold, as well as strength and endurance hundredsfold, albiet at the cost of being controlled by the infection to kill living beings. The fight consists of a lot of bubbles of infected water being launched at the player and floated up into the wires above, as well as Blisterfaces offspring, Blisterlings, attacking with their parent. After the goldfish is euthanized, it will drop Raw Xenium, an extremely crystallised form of Xenomite which, when combined with Molten Scrap, creates Xenium Bars, an infected Keycard which is used to open a special Lab Chest that contains a large amount of Raw Xenium, Starlite, and the Nano Pickaxe, which can destroy the hardest sludge, the black sludge blocks. Blisterface will also drop, most importantly, the Lab Access Panel for the Sigma Sector.
Sector Sigma[ | ]
The fourth Sector of the lab, Sector Sigma, is also one of the smallest Sectors, as it mostly consists of one room, of which the previous use is unclear, but now acts as the arena for the fifth miniboss of the lab: Protector Volt, a high-ranking, eight foot tall T-Bot missing a jaw, who uses a Tesla Cannon. When approached, after some dialogue, Volt will start the battle, replacing the floor with electricity and making his way across the arena via chains. After reduced to critically low health, Volt will then fly to the computer, having recieved a message from Girus, and will end the battle, having been told not to kill the player. After being fought, Volt will be able to be interacted with, acting as a much more menacing but friendly T-Bot compared to The Janitor, and even rematched, unlike The Janitor. When Volt is defeated, Adam, who mauled Volt to the point of ripping his jaw off, becomes aware of the players access to his birthplace, as well as finding a Tesla Cannon to match Volt's, albiet selling it at a massively high price. This implies that Girus alerted all T-Bots to refrain from attacking the player, inadverdently alerting Adam as well. After ending the fight, Volt will reward the player with the Lab Access Panel for the Omicron Sector.
Sector Omicron[ | ]
The fifth Sector of the lab, Sector Omicron, is composed of a linear path to a large arena, and appears to have been the path to Vault 0, as well as where the labs most secret projects took place. Near the end of the path is an opening to a large, electrically dangerous area, which acts like a miniature version of the laser maze in Sector Gamma. The arena consists of a flat arena with a rail at the top, and a window at the top right with the Crane Operator, a copper-haired female T-Bot. The monitor on the ground actives the fifth miniboss: The MACE Project, a large, incomplete war machine that fights with a mass of projectiles, at which point the Crane Operator will begin to operate the machine. The machine attacks in a fixed pattern of attacks, with lasers fired at the player inbetween attacks. At 33% health, the machine will let out a warning sound, switching it's attack order, and at 0% health, it will switch to it's second phase, losing it's jaw similar to Protector Volt. The second phase changes the attacks, as well as the fight. At 50% health, the war robot will remain immobile at the center of the rail, nearly invincible, and activates two fists, which take over attacking until they are destroyed, at which point the war machine will resume attacking as before until it is defeated, in which it will drop The Mace, a powerful melee weapon, a floppy disk with someone ranting about the MACE Project, and the Lab Access Panel for Sector 0, allowing access to the deepest Sector of the lab.
Vault 0[ | ]
The final Sector of the lab, Sector 0, also known as Vault 0, consists of one room with a large amount of black sludge, as well as the final and only boss of the lab: Patient Zero, the infected mass formed by the patient zero of the Xenomite infection, Kari Johansson. The fight is intially started by using the bed which was were Kari presumably slept before the infection took him over completely. The fight consists of many phases, with the infection switching attacks with the unfortunate Kari, who are treated as different entities. The fight uses a large amount of infected projectiles, and as such takes place in the largest room in the lab. The fight ends when Kari's life is finally ended, at which point the infection known as Patient Zero is destroyed along with Kari's death, dropping a mask and trophy, several weapons, a Medic Kit which increases health by 50 permanently, some Unidentified Blueprints which can be used to upgrade several weapons, a floppy disk which presumable records the last pieces of dialogue said by Girus to Kari before locking him in Vault 0 for 200 years, and a Master Lab Access Panel, which deactivates all lasers in the lab, including the laser maze in Sector Gamma. Kari's defeat also leads to the infection being relinquished from Epidotra, allowing several creatures to return. The destruction of Patient Zero also leads to Star Serpents and various creatures of the Ancient Deity Duo emerging, as well as crimson rock bursting into the ash of the underworld. The ending of Kari's 200 year stasis also means the ending of the Abandoned Lab, at which point the player can move on to finishing what the mod has in store.
Notes[ | ]
- Players with the Chaos State debuff in the Abandoned Lab prior to defeating Patient Zero will take -2000 health per second, instantly killing them if they attempt to use the Rod of Discord to skip sections of the Lab.
- Using a hoik in the abandoned lab will instantly kill the player.
- If one is capable, it is technically possible to grapple through a 1-block-wide gap to explore down to Blisterface before having to defeat Golem, letting one explore the entire area. However, this is not advised because of the massive health pool of later mini-bosses.
| Biomes and Structures | ||
|---|---|---|
| Surface Layers | Wasteland | |
| Special Biomes and Structures | Abandoned Lab • Ancient Hut • Crashed Ship • Hall of Heroes | |